
Religious Ed Online Registration
IN THIS ARTICLE:
Initial Religious Education Setup
Before you can begin to use online registration you will need to ensure the following components have been setup
Does your parish have an active website where you can setup your Religious Education registration page?
Note: If you do not currently have a website then you will not be able to use online registration.
- Do you have an online payment provider?
- You will need to obtain the link to your donation page which will be entered in your Religious Education Maintenance screen.
- Has your religious education Level Maintenance table been created?
- Have you created your religious education groups?
- Have you created your religious education classes for the current year?
- This is helpful because you're able to add students to classes as you process your new registrations.
Religious Education Maintenance Screen
The Religious Education Maintenance screen is where you manage various important settings and details. Here, you will define your (3) Religious Education Groups, the DRE's email, the Religious Education payment link, the default family status, and specify the autoreply message for parishioners who register online.
Scroll to Administrative > Religious Education Maintenance to open the maintenance screen.

Religious Education Groups
This is where you define the (3) groups that you will be using in your Religious Education program — Aides, Students, and Teachers. If you have not defined these groups within this screen drop-downs will be blank and you will not be able to populate your classes.
eCatholic ChMS RE Registration Form
Important Note: Users should promote students for the most recent Religious Ed year before opening registration for the upcoming Religious Ed year.
If your website is hosted by eCatholic you will not need to access the link to the ChMS RE Registration form. You will login into your eCatholic website dashboard, open your religious education landing page, and simply drag and drop the registration form into place.
If your website is hosted by a provider other than eCatholic, click the eCatholic ChMS RE Registration form to open the registration page. Copy the URL in the browser to set up a registration button on your website. Please contact your provider if you need assistance with setting up your registration form.

Additional information about the ChMS RE Registration Form:
- The registration form is the same form for all users.
- The fields denoted with an * are required fields.
- Registering families with more than one child don't need to open a new form for each child. They can simply click Add Child and click Submit once the form is complete.
- Grade drop-down is where the parents define the actually grade a student is in. The values in this drop-down list are set to Pre-K through 12th grade and may not correspond to the your Level Maintenance table.
Religious Education Email
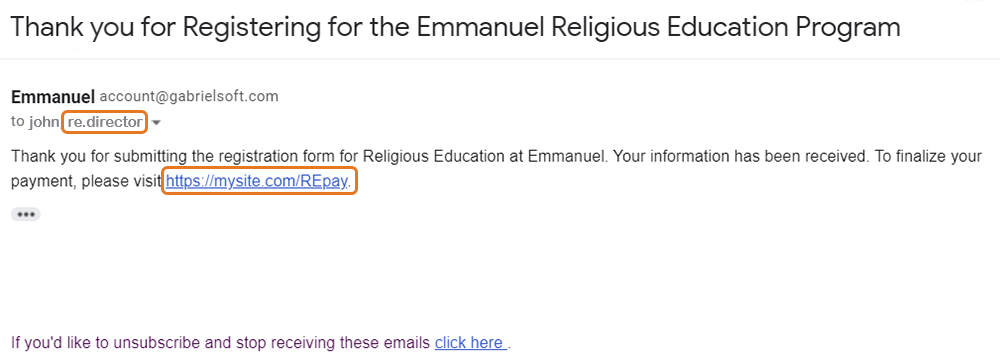
This field is used to define the DRE email and serves a couple of purposes within the Religious Ed Module. It is used as the default email for receiving new registration notifications, and will also become the email address used when emailing from within the Religious Ed Module.
Religious Education Payment URL
This is where you will define the registration payment URL. This URL will be included in the autoreply email families receive upon completion and submission of the RE form. When your families click on this link it will bring them directly to your payment page you setup on your website.
Family Status
This will be the default status automatically given to new families that register, and do not have a current family record in your database. The default status can be updated at any time by editing the new family record.

ChMS Religious Education Registration Form Autoreply
The DRE can choose between two forms that your parishioners will receive once they complete and submit the registration form.
Standard Form: The maintenance screen defaults to this option. The family will receive two autoreply's once they complete the registration process. The first will be seen automatically on the current screen and the second message will be sent to their email of registration.

Custom Form: This form allows the DRE to control the messaging the families receive upon submitting their RE registration form. Click on the Custom Tab to create your own custom message. The form allows for formatting, adding links, pictures, and even tables. Be sure to hit Save once you update your form. This custom message will be reflected in both auto-reply's. The first will be seen automatically on the current screen and the second message will be sent to their email of registration.
Once you have completed your set-up you are now ready to accept online registrations. A suggested workflow would be to notify all your parents to let them know they can now register online and direct them to your Religious Ed landing page on your website.
Processing New Religious Education Registrations
You can locate and manage all registrations by going to Religious Ed > Registration Maintenance. This screen looks and behaves like any of the other explorers in your database.
As registrations come in you will see a screen similar to the one below. There is a single line for each child that was registered and they will each have been assigned a specific status. If the status is in blue, then you will need to take action by clicking on the status.

The status' are automatically defined by the system and are listed in the chart below along with reason they have been assigned that status. The status is also an indicator as to where each student is in the registration process which is especially helpful for DREs.

Unknown Family Status
If the family could not be found in the database based on last name or email, the status will default to Unknown Family. By clicking on Unknown Family it will open the following dialogue box.

Start typing in the last name and the drop-down will begin to populate. If the correct family is not listed, check the Create New Family/Child box and click Update. The family and members will be added to your database with the status you entered in your Religious Ed Maintenance Screen. If the family is in the database, simply select that family then check to see if the child exists. If they do exist, select the correct child and hit update. The child will now be set with the status Pending Class.
Unknown Child Status
If the child could not be found in the database based on first name or date of birth, the status will default to Unknown Child. By clicking on Unknown Child it will open the following dialogue box.

In this case the Level and the Family are defined. To choose the correct child you can type the name or click the down arrow and a list of members in the family will be shown. Select the correct child and click Update. The registration for this child will go to Pending Class. If this child does not exist in the family record, check Create New Family/Child and the member record will be created and the registration for this child will also go to Pending Class.
Unknown Level
Unknown level occurs when your Level Maintenance table has not been created.
Pending Group
Pending Group occurs when the religious education student group has not been created.
Pending Class
To add the student to a class scroll to Religious Ed > Class Maintenance > View > Add Student to the class.
Registered
Any student that has a status of Registered is considered fully registered. No further action is required by the DRE.
Information on changing levels:
- For status' that are Unknown Family and Unknown Child the levels defined in the registration form are defaulted for grades Pre-K through 12th grade. The DRE can change this to another Level if needed by clicking on the drop-down under Level in the Edit box shown below.
- For students with a Pending Class status if your maintenance level setup is different than what is in the default grade level drop-down menu found in the registration form, then you will have to update the students level in the group prior to adding them to a class.

Deleting Students from Registration Maintenance
You can delete any registration(s) from the Registration Maintenance screen in two separate ways.
- Option 1: Deleting Individual Students
- Option 2: Deleting Students in Bulk / Deleting Every Student
Option 1 is ideal if you've registered test or fake students while setting up your Online Registration, or if there are any duplicate entries. Option 2 is ideal for when you need to clear your previous year's data from your maintenance screen, in order to begin fresh for a new year of registrations.
Please review the steps below to see how you can delete one or multiple students from the Registration Maintenance.
Option 1: Deleting Individual Students
To delete students on an individual basis, follow these steps.
- Click on Religious Ed in your blue navigation bar and then select Registration Maintenance.
- Once your Registration Maintenance screen appears, find the student you'd like to delete and check the box next to their name.
- Open the Actions dropdown and select Delete.
Once you select delete, there will be a confirmation pop-up that will appear on your screen. The message will differ based on your student’s registration status.
For students with a status of Unknown Family, Unknown Child, Unknown Level, or Pending Group, you will see the message pictured below and simply need to press the red Delete button to confirm your deletion. When a student is deleted, they will be removed from the Registration Maintenance Screen.

For students with a status of Pending Class, you will see the message pictured below and simply need to press the red Delete button to confirm your deletion. When a student is deleted, they will be removed from the Registration Maintenance screen and the Religious Ed Students group.
For students with a status of Registered, you see the message pictured below and have the option to remove the student from both the Registration Maintenance screen and their Class Roster. If you do not check the box, the student will only be removed from the Registration Maintenance screen and remain in their appropriate class. If you do check the box, the student will be deleted from the Registration Maintenance screen, their Class Roster, and the Religious Ed Students group.

Option 2: Deleting Students in Bulk / Deleting Every Student
To delete students in bulk, follow these steps.
- Click on Religious Ed in your blue navigation bar and then select Registration Maintenance.
- Once your Registration Maintenance screen appears, find the students you'd like to delete and check the box next to their names. OR if you are deleting every student from the Religious Maintenance screen, check the dialog box at the top of your explorer to auto-select every student on your list at the same time.
- Open the Actions dropdown and select Delete.
What happens if I delete students with different registration statuses?
Different actions will take place for each student, depending on their registration status. For a full explanation of what actions are taken for each student record based on registration status, please see the yellow box underneath Option 1 above.