Batch Contribution Entry
This article will help you to create a new batch, enter the contributions and how to edit and clone a batch. Please see the Related Articles to entering contributions directly into a fund and importing contributions.
IN THIS ARTICLE:
Batch Contributions
Scroll to Funds via the top navigation bar and select Batch Contributions. This is where you will navigate to when you want to access your Unposted Batches and Posted Batches. To create a new batch click on New Batch in the upper left corner.


- 1. When you click on the down arrow you can select a single fund for the entire batch or choose the (Multiple) fund option that will allow you to assign multiple funds within the same batch.
- 2. Enter a date for your batch. The date can be tied to the day of the Mass, date deposit was made or even the date you are entering the batch.
- 3. In the Service field, you can tie your batch transactions to a specific mass/service. To learn how to create your service options please reference the article Ministry Scheduling - Setting Up Mass Schedule (Service Maintenance)
- 4. The Description field is a text field that is optional.
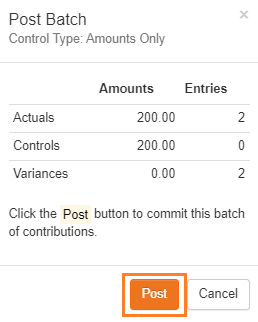
- 5. You may select the Control Information based on your internal church procedures or your Diocese may have defined what controls they would like you to follow. You have 3 options. You can then enter None, Amounts Only (enter a total $ amount for the batch) or Standard (enter a total $ amount for the batch and the total number of transactions). In the control total amount of the batch. If you choose to set a control your actuals will have to equal to the values you defined when you created your batch. If they do not equal each other then you will not be able to Post your batch.
- 6. Click Create located at the bottom of the screen. Once you have created the batch it can be accessed in the unposted batches tab until it has been posted.

- 1. If you chose the Multiple fund option when setting up your batch select the fund you would like to assign the contribution to.
- 2. In the Family Name field, you can begin to type either the Budget/Envelope Number or the Last Name. As you type in numbers/letters a list of families will begin to appear. Select the correct family and tab to the Amount field.
- 3. Enter the Contribution Amount.
- Note: When entering the contribution amount you do not need to type in the decimal places. For example, if you had a $25.00 donation you only need to type 25 not 25.00.
- 4. If the contribution is Non-Deductible then check the Non-Deductible flag. Contributions with this flag checked will be included in Annual Year-End Statements but pulled out separately and labeled as Non-Deductible.
- 5. The Comment field is a text field that is optional.
- Note: Comments will show in the Annual Statement PDF Detailed Option. The statement truncates this field to 10 characters so it is best to keep this field to 10 characters if you choose to use this option when running your annual statements.
- 6. The Reference field is used to enter check numbers. You may also use it type in for example, Cash for a cash donation.
- 7. Once you have entered all the information for this contribution click Save and the contribution will drop-down into the list below. You are now ready to go onto your next contribution.

Editing A Batch
Once a batch has been posted the batch can be reopened and can be edited.


Cloning A Batch
Batch cloning allows you to clone a batch and all the contribution records within it. This is helpful for batches of recurring transactions that occur each week. Perhaps you receive checks from parishioners online banking that come in every Thursday. The records are consistently the same with maybe one check missing or perhaps an addition. Cloning allows you to clone the batch and make any minor adjustments (additions or subtractions) without re-keying the whole batch.


