Changing Your Website Font via CSS
In the eCatholic Support Center, we frequently get asked if the font on an eCatholic website can be changed. There are lots of reasons for this (some of them better than others!), but the number one reason is for aligning your brand across your print and website. So, yes, it can be changed if you are comfortable making changes to the CSS (see below) or if you want custom work to be done.
Changing your website font happens at the CSS (Cascading Style Sheets) level of your website. CSS is what gives your website a particular look and feel. We’ve purposely put the option to control the font at this level for a couple of really good reasons. First, it helps to give your site a uniform and professional look to it. Secondly, putting the font controls in the CSS was intentionally done to align with good design principles. Think of it as eCatholic helping you to avoid a major pitfall that can sometimes be found on websites where too many different kinds of fonts are used at once!
There are some best practices when it comes to changing the font on your site that we’d like to share with you before we tell you how to do it.
- When selecting the main font for the vast majority of your text, use vanilla fonts, like Arial, as it makes for easy reading and accommodates people who scan web pages quickly. If you want to use fancy text, save it for Module Titles or Page Titles.
- Take readability into context when selecting a font. Using sans serif fonts is meant for reading from far away and to grab attention, whereas serif fonts are meant for reading up close and helping to make a personal connection to what is being read. Think about your audience and use what would appeal most to them.
- It's best to use a web safe font, meaning it ensures maximum compatibility between browsers/operating systems.
How to access the CSS:
First, go to the Design Studio. Under your current theme, you will see a link called "Create a custom theme from this theme," or "Edit custom theme" if you've already made some modifications. Click that link to create a custom theme and access the theme editor.
You'll land in the Draft tab, but you'll notice there are some other tabs across the top. You can find the following in these tabs:
- Style guide: some basics about editing the code, as well as a quick reference of common variables and pre-installed fonts.
- Base: this code defines the basic level of styling for your website. This is what you see when you use the "Base" theme, and all other themes build off of this. You can find all of the variables that can possibly be changed in the Base code.
- Theme: this code adds/modifies the Base code to create the look and feel of your theme
- Style: this code is used to make the color variations eCatholic provides for a theme.
- Draft: this is the area you are able to edit. Please don't copy and paste the entire page of code from the Base, Theme, or Style tabs to the Draft tab. Just enter or copy the lines you actually want to change.
We will show you below which variables to use to make changes to your font or how to upload a new font not already pre-installed on your website.
Some tips before you begin:
- Unless you are familiar with CSS, changing more complex parts of the code can give you undesirable results so use only the variables to make your changes (with the exception of the code we give you below when adding new fonts).. Variables have the format @variableName. Most variables will be followed by a comment that explains their purpose. The text following the '//' is a comment that helps explain the purpose of the variable and also gives you a hint on how to change it. For example, this variable can be found in the Base tab: @siteFont: Helvetica, Arial, sans-serif; //universal default font
- At eCatholic, we find it helpful to use commenting to track who made changes and when they were made. This is done by adding ‘//’ after the line of code and putting the previous variable along with our initials and the date we made the change:@siteFont: Helvetica, Arial, sans-serif; //none 7-1-16 CR
When making changes, please note:
- Save - saves your changes as a draft, this does NOT publish the changes
- Preview - shows you how saved changes look on the site
- Upload File - can be used to upload files you want to incorporate via code
- Back - takes you back to the Design Studio without saving your changes
How to make changes to the CSS:
You can find many of the variables below on the Style Guide tab, but we’ve included some additional variables that our Support group has encountered as common requests for variable changes. To make changes, follow these steps:
- Highlight and copy the code from the Style Guide, other tab, or this help article
- Paste the code into the Draft tab
- Replace the value of the variable with the one you want to use.
- Add a comment using // after the variable change to record any thought. Comments do not affect the CSS and are entirely optional, but help you remember why you made that change.
- Save. This won't affect your LIVE site, only the site in Draft mode you see when logged in.
- To see the effect of your change, you can then click the Preview button to see a preview opened in a new tab.
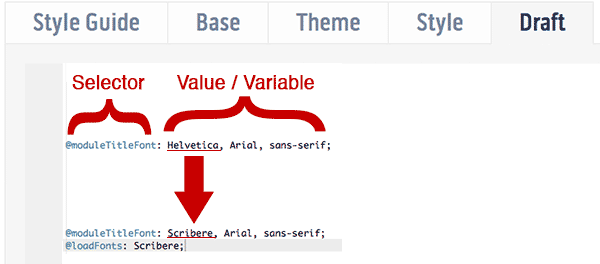
For example, in the image below, the Module Font Title throughout the site would be changed from Helvetica to Scribere. If you’re using a special font like Scribere (see font list below), be sure to load it, too!
Font Change Variables:
The following variables will help you to change the font on your site.
- @siteFont - The font used through the site
- @siteNameFont - The font used for the site name in the header
- @pageTitleFont - page titles font
- @moduleTitleFont - module titles font
- @mainNavFont - first level navigation font family
- @mainNavSecondaryFont - second level navigation font family (by default this is set to @mainNavFont)
- @sideNavFont - side nav font
- @slideshowTitleFont - font for slide titles
- @slideshowCaptionFont - font for slide captions
To use one of the pre-installed fonts below, you will first need to enter the following variable on the draft tab, replacing font name with the name of one of the fonts below.
@loadFonts: "Font1", "Font2";


If the font you want to use is not a pre-installed font AND it's either a royalty-free font or you own the rights to it, you can follow these steps to install and use it on your website.
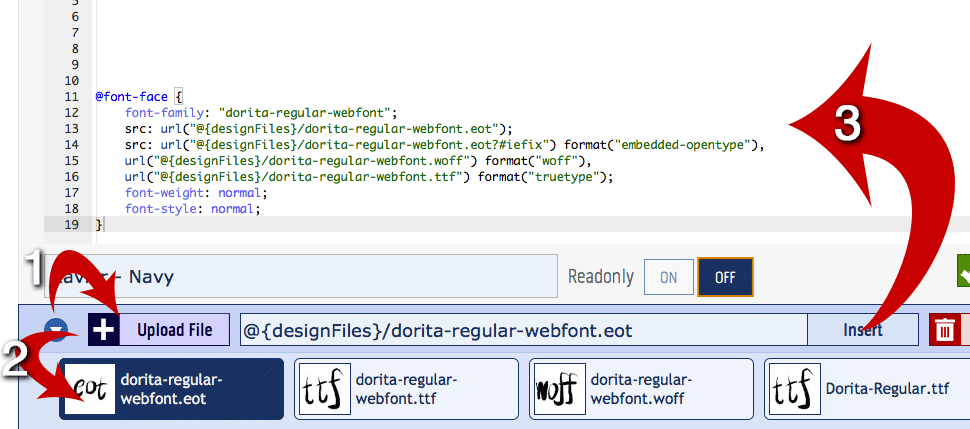
- From the Draft tab, click on the triangle in the lower left to expand that bottom area. Use the +Upload File to upload your font file. If the file won’t upload due to incompatibility, please use the Webfont Generator at Font Squirrel to generate a compatible file. Select the Optimal option.
- Select your font.
- Click on the Insert button to load the font into the theme. You can now use this font as a variable in your CSS styling now.
As always, if you have any difficulty with executing a change in your site’s font, please contact our Support Department at 877-932-1776 ext. 2 or [email protected] for assistance.