
How to install Power BI and configure to your ChMS account
Power BI is a business analytics service by Microsoft. It aims to provide interactive visualizations and business intelligence capabilities with an interface simple enough for our users to create their own reports and dashboards. The PowerBI Desktop software is offered FREE of charge.
eCatholic ChMS is providing PowerBI dashboards and pre-formatted reports to its parishes at no additional charge. Users need to download the PowerBI software and .pbix files (linked below) to use the reports. Data contained in the initial file you download from our Demo parish. Follow the instructions outlined below which will explain how to download the necessary files, how to change the data source so it points to your data and how to login using your ChMS user credentials.
Download the pbix file that you want to use by clicking on the one of the links below. Choose either the single parish or multi-parish .pbix files. The file will be placed in your downloads folder. You may want to move the file to your Desktop or a folder within your My Documents area. Remember where you put it so you can find it!
Note: If you are managing a single church then you will want to download the Gabriel Pastor Dashboard.pbix file. If you are managing a cluster or collaborative you will want to download the Gabriel Multi Parish Pastor Dashboard.pbix file. This will allow the user to look at all your churches within the cluster or collaborative.
- Single Parish: eCath GabrielSoft Pastor Single-Parish Dashboard
- Multi-Parish: eCath GabrielSoft Pastor Multi-Parish Dashboard
Each file above contains 5 reports:
- Pastor’s Dashboard – looks at contributions by fund, family; count of families participating in the offering and average contribution amount; all controlled via a relative date filter (last week, last month, last quarter, etc)
- New Family Registrations – using relative date filter can see how many new registrations have occurred in the parish during the period selected.
- Giving by Year – Filter set to contributions > 2018 to show three years; this can be changed on the filter tab by the user; shows giving by family across the years and average contribution.
- Source of Giving – this report looks to answer where is the giving coming from? Online, envelope, etc. Number of Families by Zip Code/Registration date – user can use a date filter to see where families are located on a map.
- Average Contribution by Zip Code – this report shows the average contribution and displays it on a map.
Click on the link below to download the PowerBI Desktop Software (FREE). Clicking the link will open the Microsoft Store in your browser. Click install. The download will take approximately ~5 minutes via a cable/high speed connection. Time will depend on your internet connection speed. Click the Launch button and Power BI will install.
When taken to the website click on the Download free Button.

In Power BI, Fill out the registration form and press done. Click “Open Other reports” on the left hand side of the pop up. In next pop up window, click the folder in the left panel of the screen where you placed the .pbix file in step 1 above.
In the right panel you will see a file “Gabriel Pastor Dashboard.pbix” (or “Gabriel Multi Parish Pastor Dashboard.pbix”), the file you downloaded in step 1 – click on the file and then press the open button.
The data you initially see in the report is from our Demo system. For the program to look at your parish complete the steps below.
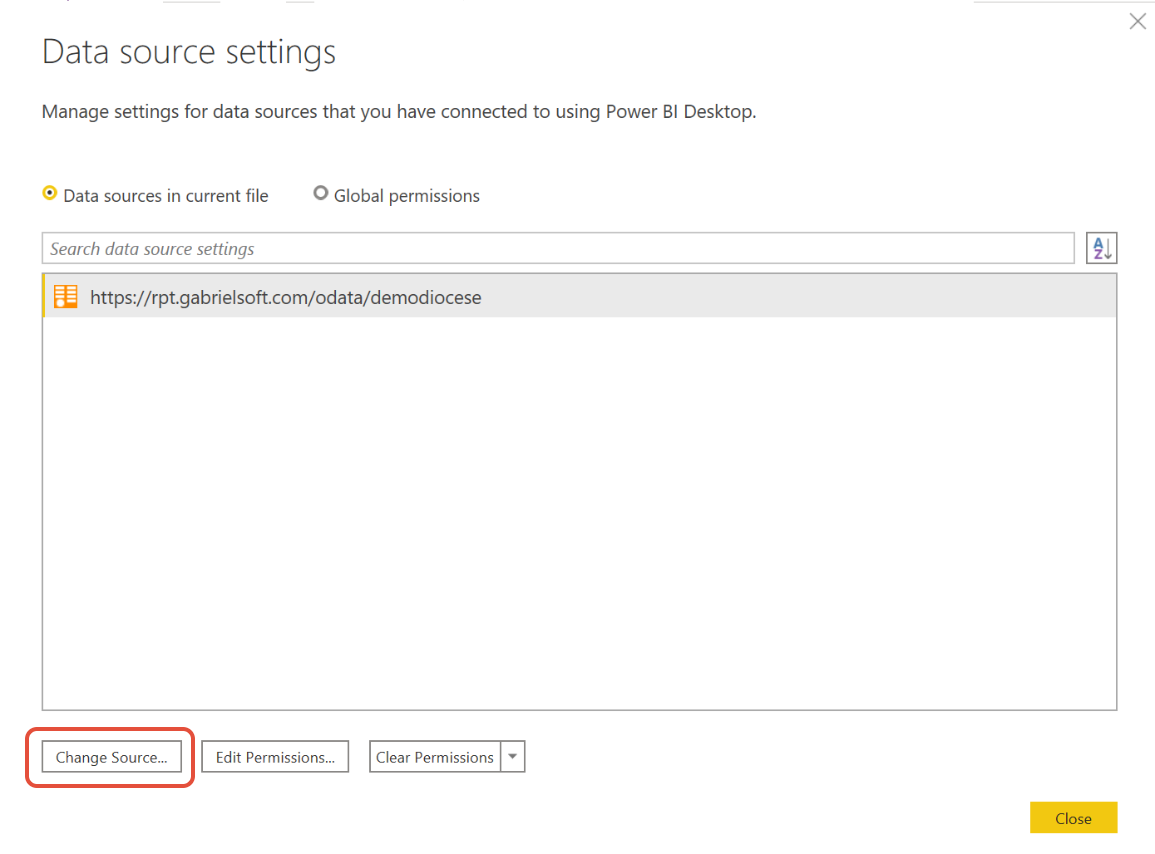
- Click the File dropdown menu in the top left of the screen and select Options and Settings and then select Data Source Settings.
- The Data Source pop up screen will show the link pointing to the “demodiocese”. You will need to change that to point to your diocese.
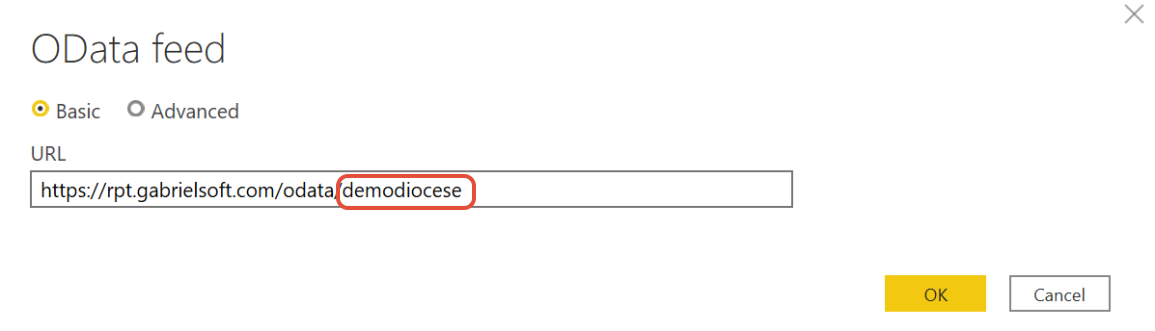
- Click the change source button and replace demodiocese with the PowerBI Diocese Tag for your diocese in the list below and press the OK button.
| PowerBI Diocese Tag | Name of Diocese | State |
| akfbdiocese | Fairbanks | AK |
| azpxdiocese | Phoenix | AZ |
| tnazdiocese | Tucson | AZ |
| cafrdiocese | Fresno | CA |
| caladiocese | Los Angeles | CA |
| casddiocese | San Diego | CA |
| casddiocese | Stockton | CA |
| codvdiocese | Denver | CO |
| flpbdiocese | Palm Beach | FL |
| pnthfldiocese | Pensacola–Tallahassee | FL |
| hihldiocese | Honolulu | HI |
| dbiadiocese | Dubuque | IA |
| iascdiocese | Sioux City | IA |
| childiocese | Chicago | IL |
| ilrddiocese | Rockford | IL |
| kssadiocese | Salina | KS |
| kyobdiocese | Owensboro | KY |
| lalfdiocese | Lafayette | LA |
| demoappeals | Demo Appeals | MA |
| demodiocese | Demo | MA |
| mafrdiocese | Fall River | MA |
| maspdiocese | Springfield | MA |
| mawrdiocese | Worcester | MA |
| testdaverdb | testdsaver | MA |
| pdmediocese | Portland | ME |
| glmidiocese | Gaylord | MI |
| mnstcloud | Saint Cloud | MN |
| kcsjmodiocese | Kansas City-Saint Joseph | MO |
| biloxidiodb | Biloxi Dio | MS |
| msbxdiocese | Biloxi | MS |
| fgnddiocese | Fargo | ND |
| nhmndiocese | Manchester | NH |
| njnkdiocese | Newark | NJ |
| pnnjdiocese | Paterson | NJ |
| nynydiocese | New York | NY |
| nyobdiocese | Ogdensburg | NY |
| cintestdb | CINTEST | OH |
| ohcndiocese | Cincinnati | OH |
| ohrmeparchy | Romanian Eparchy Canton | OH |
| orgsouthdb | Catholic Org South | OH |
| orpddiocese | Portland | OR |
| paphdiocese | Philadelphia | PA |
| ripvdiocese | Providence | RI |
| sdrcdiocese | Rapid City | SD |
| Amarillo_dio | Amarillo Dio | TX |
| amtxdiocese | Amarillo | TX |
| eCathDemo | eCathDemo | TX |
| fwtxdiocese | Fort Worth | TX |
| tesliodemo | TESLIODEMO | TX |
| txdsdiocese | Dallas | TX |
| tytxdiocese | Tyler | TX |
| occusa | OCC | MI |
| kyotestdb | SLCTEST | UT |
| demo500k | Demo (500K Families) | VT |
| vtbldiocese | Burlington | VT |
| waspdiocese | Spokane | WA |
| auptdiocese | Perth | Western Australia |
| gbtestdb | GBTEST | WI |
| gbtestdb3 | GBTEST3 | WI |
| wigbdiocese | Green Bay | WI |
| wimldiocese | Milwaukee | WI |
| wycydiocese | Cheyenne | WY |
Next click on edit permissions, and under credentials section click on the edit button.


With Basic highlighted on left enter your username and password, press save and then press ok and then press save. By completing this step it will connect you to your database(s).

A message should appear that says changes have been detected, press the apply changes button. OR if a message doesn't appear press the Refresh Button on the Home Ribbon as shown below.

- Data from your parish will now start to download
- NOTE: this could take between 5 and 10 minutes depending on your internet connection speed. Simply allow it to finish
- You now can interact with the reports with your data.
- When finished and closing the application be sure to click save to the question about saving your changes.