
Annual Statements - Mail Merge
If you'd like to customize your annual statements, you'll need to use the Mail Merge process which requires you to choose a template, customize it to your needs, and then merge the template with your downloaded Annual Statement (.xls).
Tip: If you don't need to customize your letters, you can easily and efficiently generate Annual Statement (PDF) through the ChMS alone. Please reference the following articles to learn how to do so:
IN THIS ARTICLE:
Tip: Prior to beginning this process we suggest you create a folder called "Annual Statements" on your desktop. This folder can be used to store your templates, the Annual Statement (.xls) file, finished statements and labels. Storing these files in a single folder will make them easy to locate and use during the merge process and for accessing at a later date if needed.
Downloading Annual Statement (.xls)
The first step in generating your fully customizable annual statements is to download the Annual Statement (.xls) which is also known as your "Data Source".
1) Log into your ChMS and go to Funds > Fund Maintenance.
2) If you only want to include certain funds in the annual statements, check the box(es) next to the funds you want to include. If you want to include all active funds in the annual statements, ensure that you are in the "Active" tab then check the box next to "Fund Description". (If you want to include inactive or diocesan funds, you will need to click into those tabs to make your selection.)

3) Now select Annual Statements > Annual Statements (.xls).
4) Choose the date parameters you want to generate the annual statements for. (It will typically be 01/01/YYYY-12/31/YYYY.)
5) Click Print.
This Excel file (also referred to as your Data Source) will contain all the necessary contribution data for each family that has donated to the funds you selected in Step 2 within the date parameters selected in Step 4.
Choosing a Template
You may choose one of the templates below for your annual statements and customize it how you'd like. (Read the notes in the gray callout boxes within the "Mail Merge" section below to see how you can create your own template from scratch.) Regardless of which template you choose, the data will get pulled from the Excel file (.xls) which is subject to the funds and date range you selected.
Templates
a. By Buckets
b. By Buckets Template with Non-Deductible Contributions
Please read the following for descriptions of the templates linked above:
a) By Buckets - Funds can be tagged Bucket 1, 2, or 3. Click on Funds > Fund Maintenance and then select the fund in question. Within the Fund Information tab, you can select a bucket for the fund near the bottom left corner.

This template will total the contribution amount for each of the three buckets. This data is displayed within Columns W, X, and Y in your Excel file (data source). The fund names tied to each bucket will be listed in Columns Z, AA, and AB.
Tip: Some parishes will group the funds as follows:
- Bucket 1 - All parish funds
- Bucket 2 - All diocesan collections
- Bucket 3 - Capital campaign/annual collection/maintenance collections
b) By Buckets with Non-Deductible Contributions - This template is the same as above (gives a contribution total for each bucket), and includes a total for non-deductible contributions.
c) Lump Sum - Provides a single total for all of the contributions.
d) Lump Sum with Non-Deductible Contributions: Provides a single total for all of the deductible contributions and includes a separate total for non-deductible contributions.
e) Tri-fold No10_Window Envelope Template - This template is for those who would like to use a No 10 Window Envelope to mail their Annual Statement Letter. In addition, this template contains the variable tags if you would like to use the Summary Buckets to group individual funds together. You tag a fund to one of three buckets via Fund Maintenance, selecting the fund in question, and editing the bucket in the Fund Information tab. During the generation of the data file, summary totals are calculated for each bucket. Some parishes will group all parish funds in one bucket, all diocesan collections in a second bucket and perhaps and capital campaign/annual collection/Maintenance collections in the third bucket.
If you prefer a single contribution amount you can edit this template by deleting the unnecessary categories. Just be sure when editing that you do not change the location of the parishioners mailing address and the churches address at the top.
Note: This template contains a line on the right side to help with folding. If you fold the bottom of the page up to that line and bring the top to the fold it will fit into the envelope properly.
Customizing a Template
If you choose to use one of the templates linked above, you'll need to adjust it accordingly. You can update the parish-related information, add a signature, and add any additional information/text you may want. If you'd like to add additional merge fields to this template (such as Budget Number), please proceed to the next section to see how you can insert merge fields.
Important Note: Care should be taken to ensure that none of the merge fields are edited as this will impact how the data is input during the mail merge. The merge fields are anything within the brackets such as <<Salutation>>. The mail merge will use the data from your data source to display the proper result for each of the merge fields.

Mail Merge
1) Open up the template you downloaded from the above section.
Note: If you'd prefer to create your own template from scratch rather than adjusting the template provided above, please open up a blank Microsoft Word document, then proceed to Step 2.
2) Select Mailings > Start Mail Merge > Step-by-Step Mail Merge Wizard.

3) You'll see a "Mail Merge" pop-up on the right. Letters will be selected by default. Click Next: Starting Document found in the bottom-right of your screen.

4) Step 2 of the mail merge will have Use the current document selected by default. Leave it as such and click Next: Select Recipients.
5) Within the Mail Merge pop-up you'll see that Use an existing list is selected as the default. Leave it as such and click Browse.... A "Select Data Source" pop-up will then appear. Locate and open the Annual Statement (.xls) that you downloaded which will be labeled SummarizedAnnualStatements.

A second pop-up, "Select Table" will then appear. First row of data contains column headers will be selected as the default. Leave it as such and click OK.

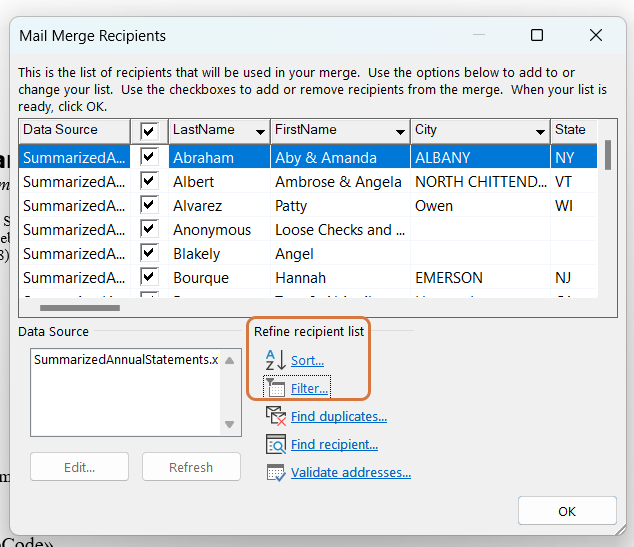
A third pop-up, "Mail Merge Recipients", will appear. This is your opportunity to sort/filter the recipients if desired. Once you've sorted and filtered your recipients as desired, you should then click Next: Write Your Letter in the bottom-right of your screen.
6) You are now on Step 4 of 6—Write Your Letter—within the Mail Merge Wizard process. If you need to make any additional edits to your letter you can do so in this step.
Tip: If you're using a template provided above, perhaps this is the step you'd like to use to add in the Pastor's signature and enter the name of your church.
Note: If you're creating your own template from scratch, this is the step where you can add any content you'd like to see. "Merge Fields" is what Microsoft will use to pull in information from your data source. (The Merge Fields are the headers found within your data source.) This information will change for each recipient. The rest of your letter (the content not found within brackets << >>) will remain the same regardless of who the recipient is.
To insert a merge field, click Insert Merge Field and select whatever field you'd like to add.

The following merge fields are likely ones that you'd like to add to your letter, but it is your template so feel free to add whatever fields you'd like:
- Name related fields: Salutation, First Name, Last Name
- Address related fields: Address Line 1, Address Line 2, City, State, Zip
- Contribution related fields: Summary 1 total, Summary 2 total, Summary 3 total, etc.
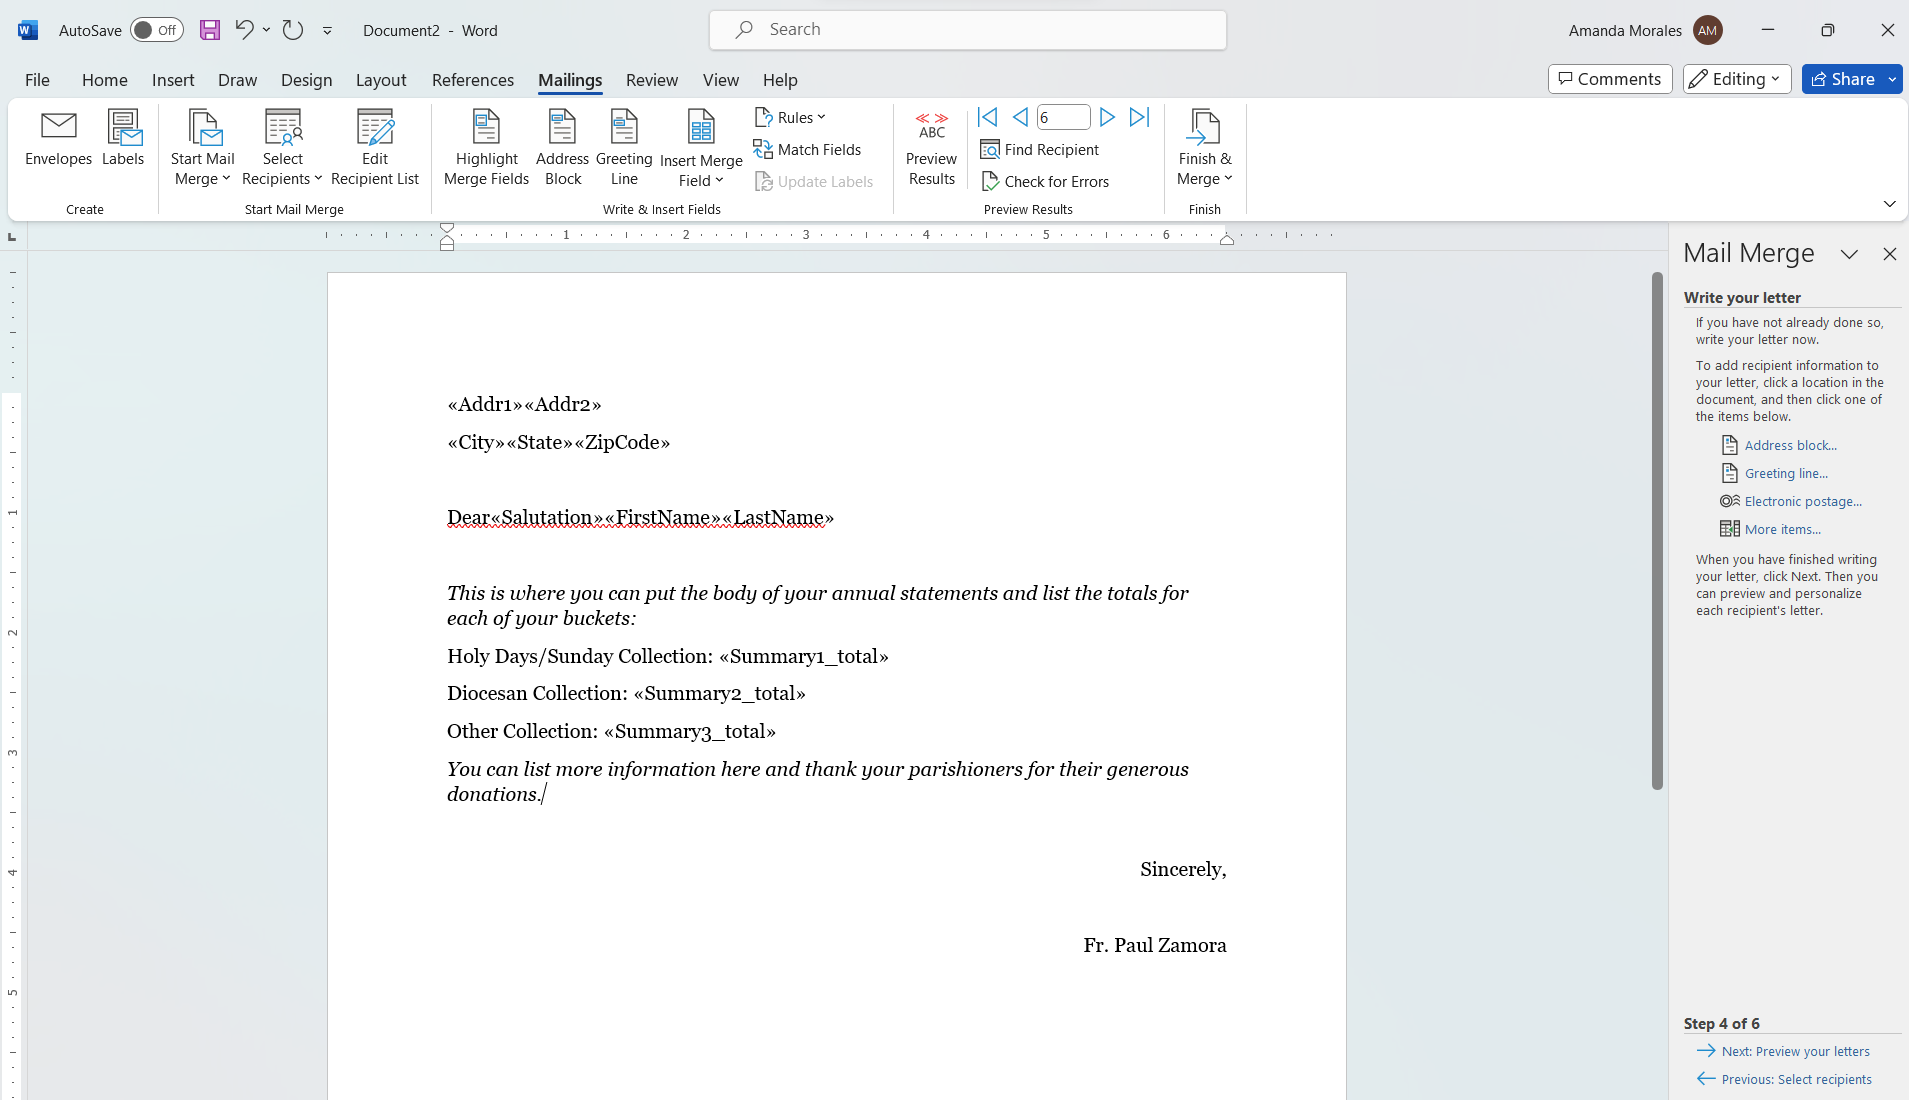
You'll want to be sure to format your letter, including the merge fields, however you'd like to see it displayed in the letter. For instance, there should be a space between the merge fields First Name and Last Name. If there is no space between the merge fields, there won't be a space when the recipients names are filled in. Please see the screenshots below for an example.
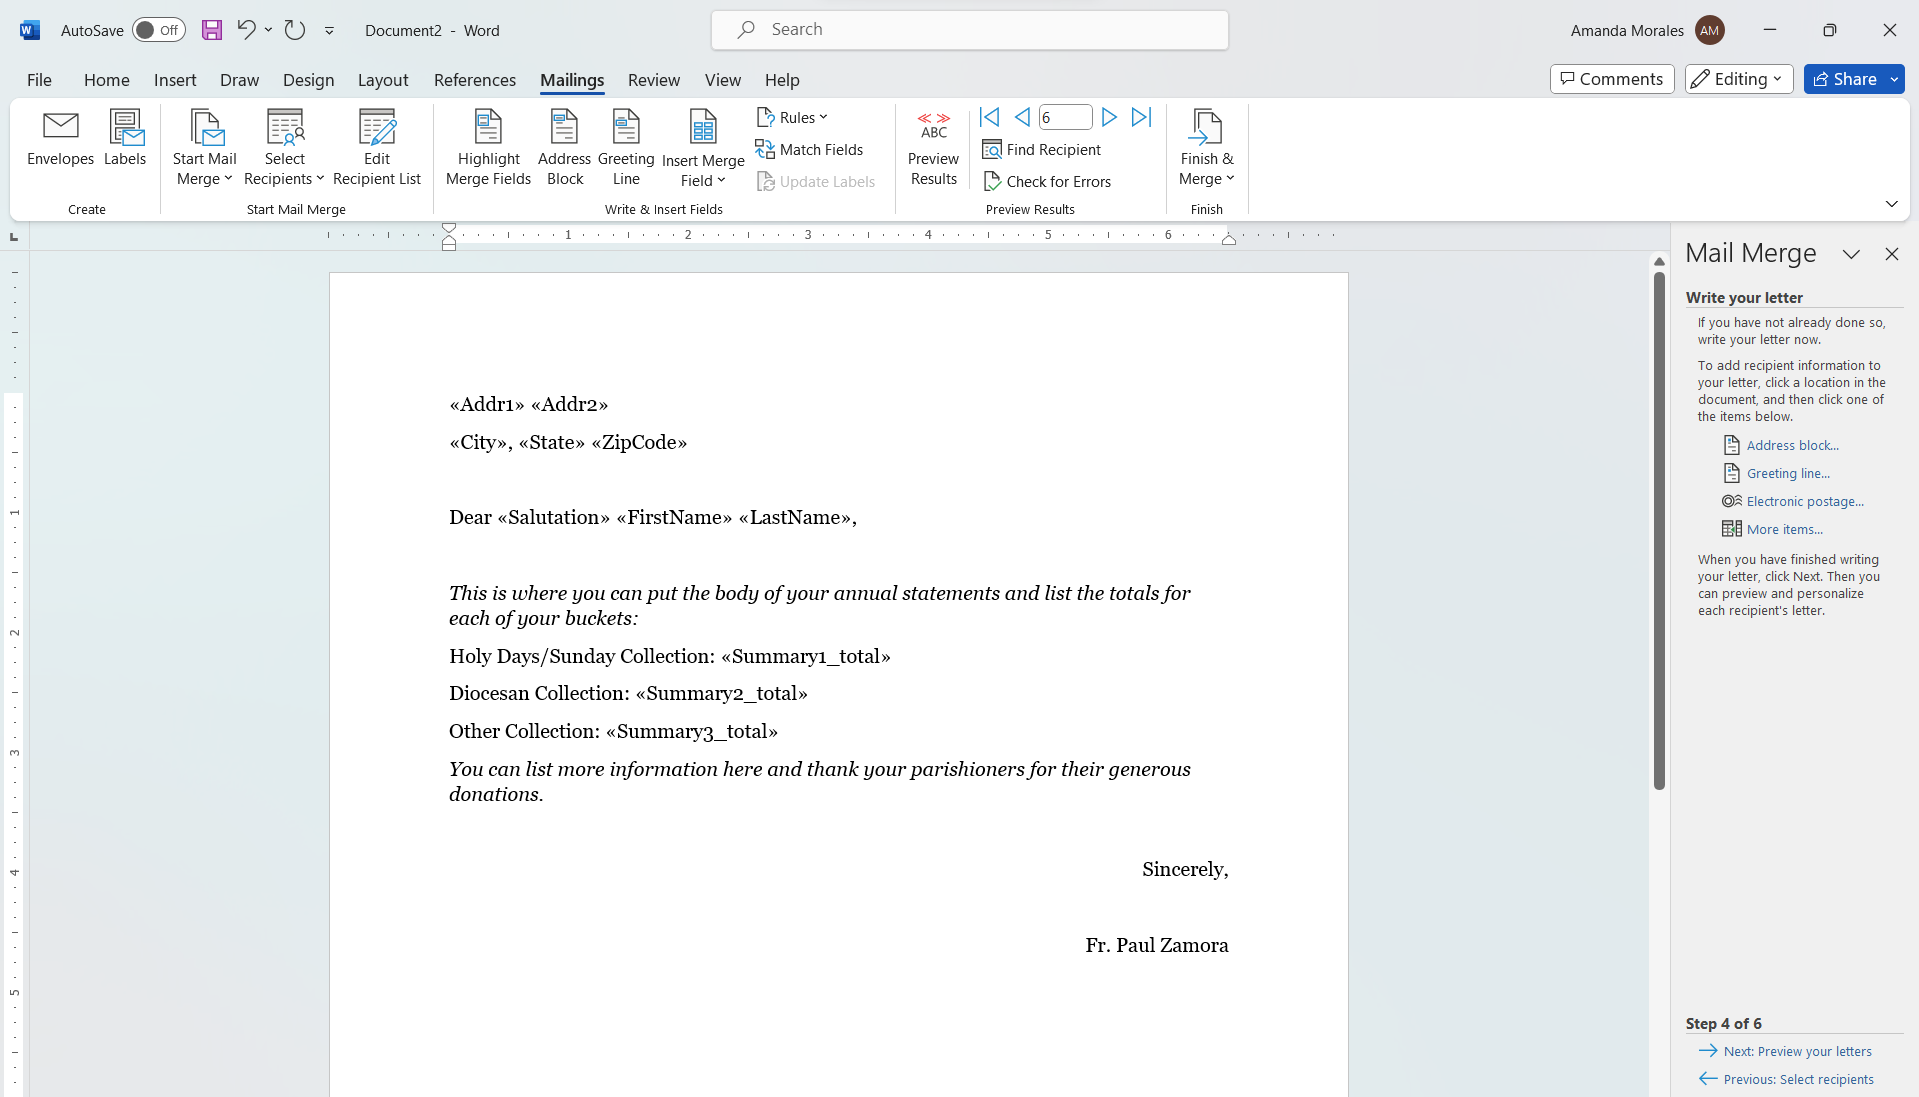

The following two screenshots will show you what incorrect formatting will look like:

When you're ready to proceed, click Next: Preview Your Letters in the bottom-right of your screen.
7) This step allows you to preview what each of your letters will look like prior to actually merging it. In the top-right of the "Mail Merge" pop-up you can flip back and forth through your different recipients.
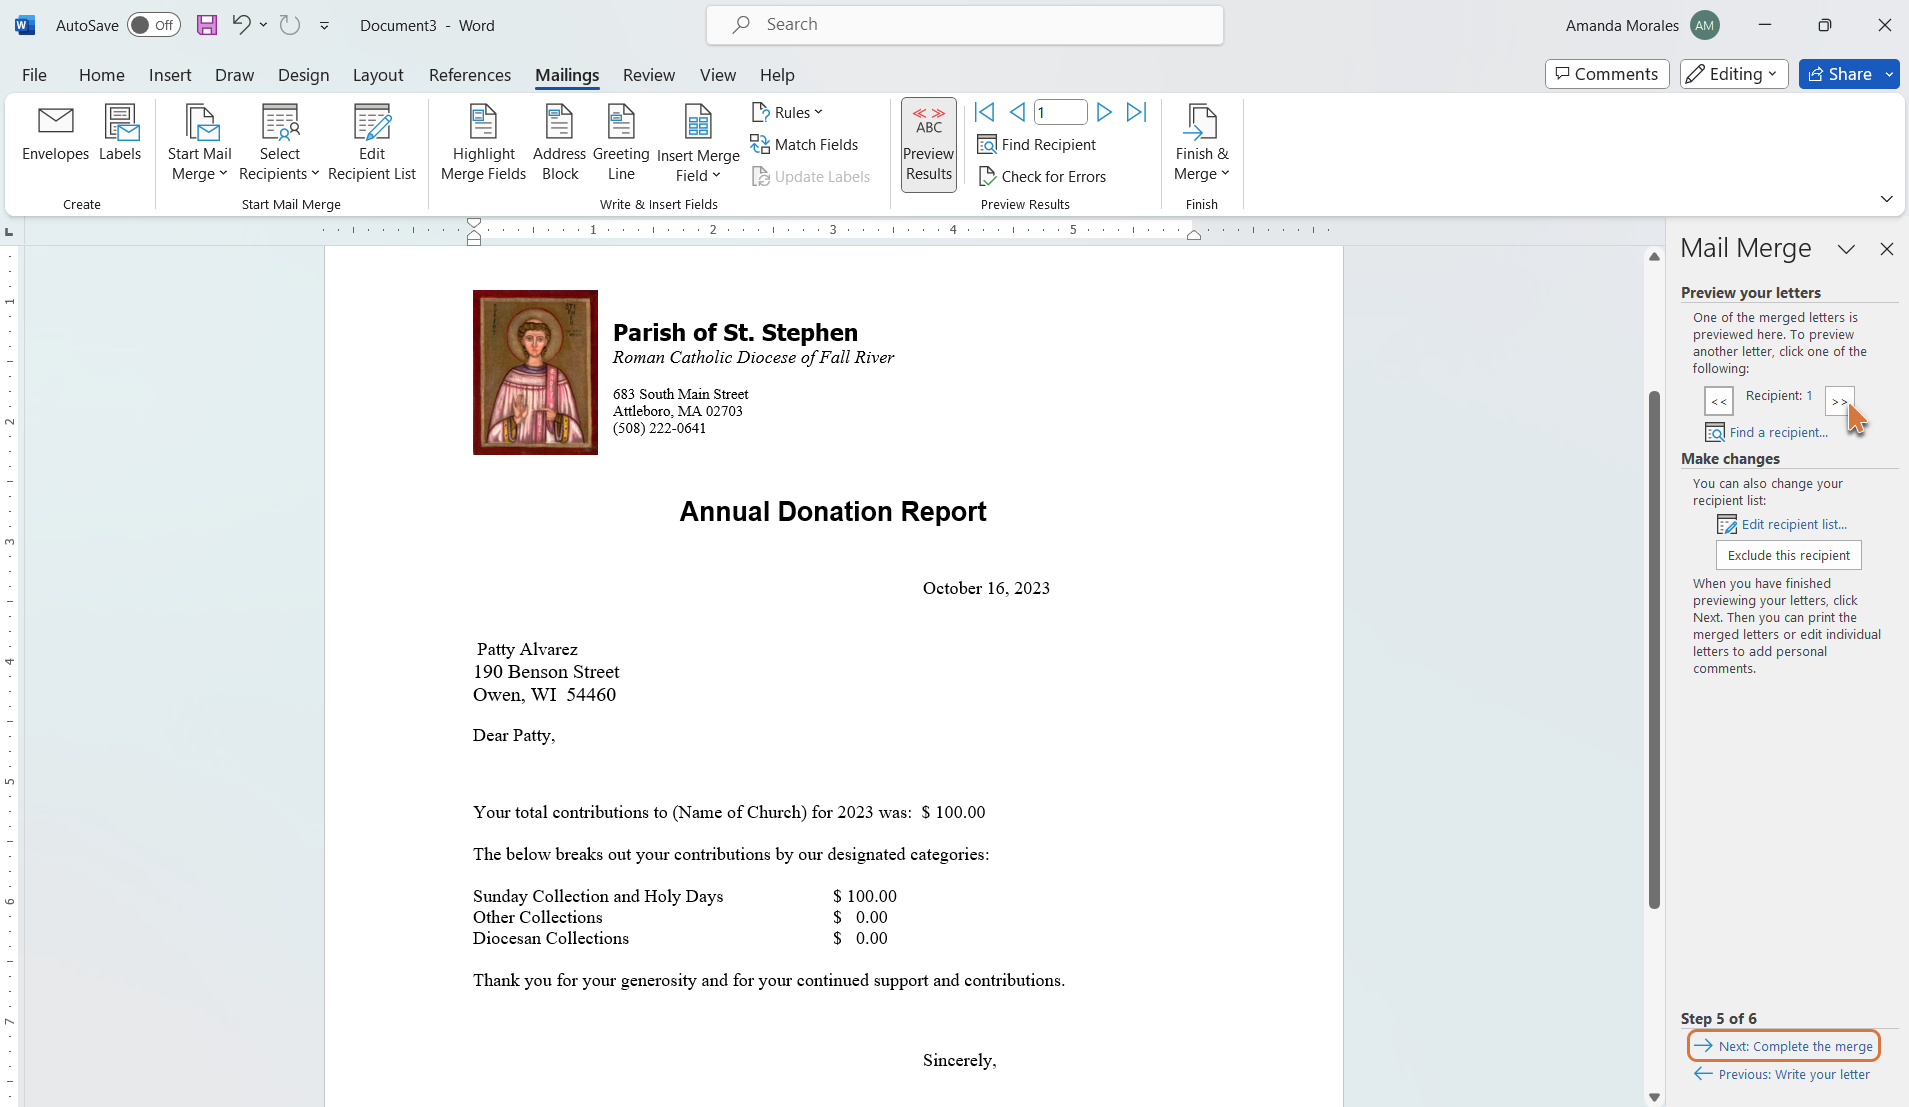
If you're happy with how it looks you can click Next: Complete the merge in the bottom-right.
8) At this point you can either press Print to send them to the printer, or press Edit Individual letters. If you choose the latter you can select all letters, a specified range of letters, or the current letter to be added to a new Word document. This allows you to save the file to your desktop or another folder you have created for your Annual Statements. They'll be available should you need to access them in the future.