Understanding the Site Map Editor
Clicking on Site Map in the white Admin Toolbar opens the Site Map Editor. Your site map is essentially a list of the pages on your website and how they relate to one another.

Here’s how to use the Site Map Editor to build and organize the structure of your website
How to build and organize your site with the Site Map Editor
Understanding levels of navigation
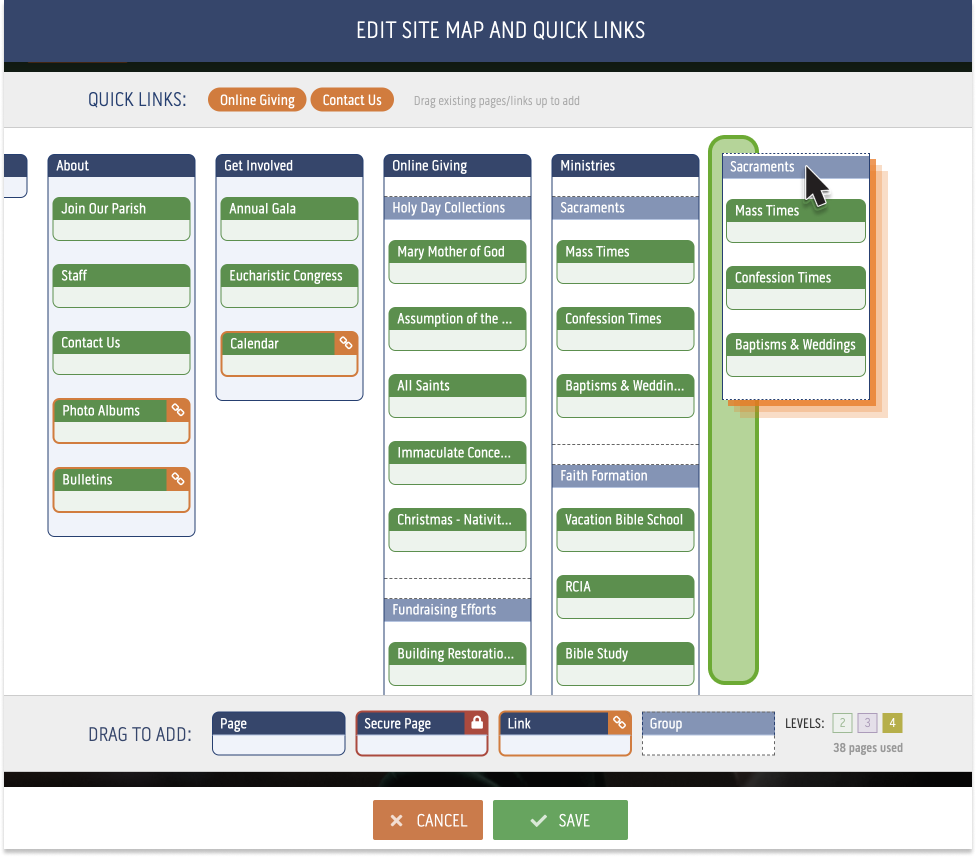
Your site map is organized hierarchically (i.e., with tiers/levels of importance), and your website can contain a maximum of four “levels.” The sitemap is color-coded to help distinguish between the different levels of your site.
- Level 1 - Blue
- Level 2 - Green
- Level 3 - Purple
- Level 4 - Yellow

The Site Map Editor displays all 4 levels by default. To filter out levels 3 and 4 from view, click the appropriate number in the Levels menu at the bottom right of the Site Map Editor (illustrated above). For example, clicking 2 will display levels 1 and 2 only; Clicking 3 will display levels 1, 2, and 3 only, etc.
How to rearrange pages and other elements
Organize pages, secure pages, and links in the site map using drag and drop. Simply click and drag an element from one location and drop it wherever you'd like it to appear (illustrated below).

How to delete pages and other elements
To delete pages and other elements from your site map, hover your cursor over an existing element, then click the trash can icon to delete it (illustrated below).

Site Map Level 1 options and functionality
Anything added to Level 1 in your Site Map will appear as a menu option in the navigation bar throughout your website. Both pages and groups may be added to your Level 1 of your Site Map and they function differently. Here how:
- Page: Adding a page to Level 1 in your Site Map will create a clickable button on your website's navigation bar. This button leads to an interior page on your site if clicked and if there are subpages present, the button will also open a drop down menu when hovered over.
- Group: Adding a Group to Level 1 in your Site Map will create a non-clickable menu header on your website's navigation. Upon hover, this header will open a drop down list of pages or links that were placed within that group. This header is not linked and it cannot be "clicked" by visitors.
NOTE: Level 1 Groups only open a drop down menu if you have added at least one page or link within the same group.
How to add a Group to to Level 1 of your Site Map
Adding a Group to Level 1 of your Site Map is the same as adding a page:
- Open your Site Map
- Drag-and-drop a Group from the toolbar into your Site Map (Illustrated below)
- Add or create subpages or links to add to the Group
- Save your changes.
FAQ: How many items will fit in my main navigation bar?
-
There isn't a black-and-white answer to this question; the total number of items that will fit in your main navigation bar depends on the number of characters in the names of your main navigation items.
For example, having main navigation items with short navigation names (e.g., News, Media, Donate) will allow you to have a greater total number of items in your main navigation bar. This is because each item consists of a relatively small number of characters. On the other hand, having main navigation items with long navigation names (e.g., Annual Appeal, Eucharistic Adoration) means a fewer total number of items will fit in your main navigation bar.
Regardless, we recommend using 4-6 main navigation items on your website.
NOTE: For more general tips on how to build a clear and helpful site map, check out The art of building an awesome site map on the eCatholic blog.